Master the Crochet SP: Your Guide to Perfect Stitches
Crochet is a craft that uses yarn and hooks to create beautiful and functional projects. If you’re new to crochet or even an experienced crocheter, you may have come across abbreviations in crochet patterns that can be a bit confusing at first. One such abbreviation is SP, which stands for Slip Stitch.
Slip stitches (SP) are one of the most basic and essential techniques in crochet. Despite their simplicity, they play a crucial role in helping crocheters join pieces, finish off rows, and create neat edges. In this blog, I will guide you through everything you need to know about SP in crochet, from its definition to its uses, techniques, and tips for mastering this essential stitch.
What is SP in Crochet
SP stands for Slip Stitch in crochet patterns. It’s often used in situations where a crocheter needs to join stitches, finish off a row, or work in tight spaces without adding any height to the project. Unlike most other stitches that add height, the slip stitch is almost invisible and creates a smooth connection between different parts of your crochet work.
Key Features of Slip Stitch (SP)
- Flat stitch: Slip stitches don’t create height as single or double-crochet stitches do.
- Invisible join: It’s often used to join rounds or motifs without showing noticeable seams.
- Useful in various applications: Commonly used in borders, edges, and when switching yarn colors.
Let’s dive into the details and step-by-step instructions to help you understand and master this basic stitch.
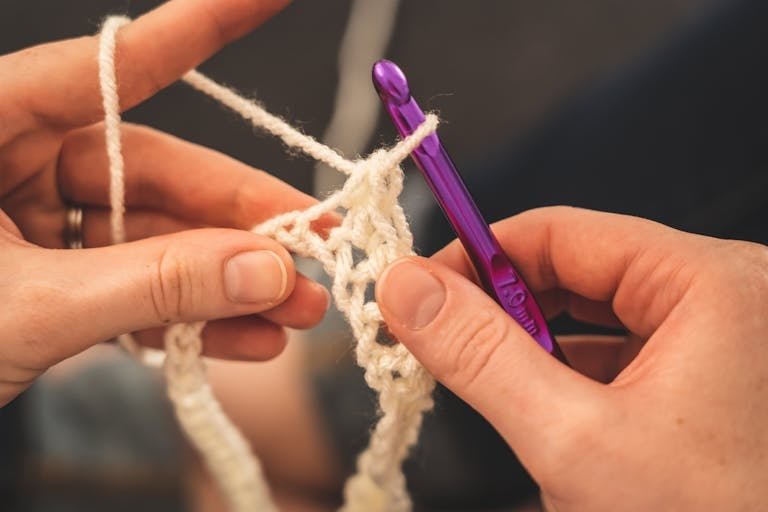
How to Make a Slip Stitch (SP)
Learning how to make a slip stitch is simple, and once you’ve practiced it a few times, you’ll be able to do it without thinking. Follow these steps to work a slip stitch correctly:
Step-by-Step Instructions for Slip Stitch (SP)
- Insert your hook:
- Insert your hook into the next stitch where you want to work the slip stitch.
- This could be in the top of a stitch from the previous row or into a chain space, depending on the pattern.
- Yarn over (YO):
- Yarn over by passing the working yarn (the yarn attached to the skein) over the hook.
- Pull through the stitch:
- Pull the working yarn through the stitch you inserted the hook into and the loop on your hook at the same time.
- Result:
- After completing the slip stitch, there will be one loop left on your hook. This completes the stitch without adding any height to your work.
Helpful Tips
- The slip stitch can sometimes be tight, so make sure you’re not pulling the yarn too hard.
- Always ensure you’re following the pattern carefully to know exactly where to place your slip stitches.
Slip stitches are the foundation for many other crochet techniques. Now, let’s look at how slip stitches are used in different scenarios.
Common Uses of Slip Stitches in Crochet
Slip stitches may be simple, but they serve several critical purposes in crochet. Whether you’re working in rows, rounds, or making amigurumi, SP is an essential tool.
1. Joining Rounds
- In projects that are worked in the round (like hats or coasters), a slip stitch is commonly used to join the last stitch of the round to the first one, creating a seamless join.
- How to Join Rounds with SP:
- After completing the last stitch of your round, insert your hook into the top of the first stitch.
- Yarn over and pull through both the stitch and the loop on your hook.
- This will close the round, creating a seamless edge.
2. Seaming and Joining Pieces Together
- Slip stitches are used to join separate pieces of crochet together, such as when joining granny squares or assembling crochet garments.
- How to Seam with Slip Stitch:
- Line up two pieces of crochet with the right sides facing each other.
- Insert your hook into the first stitch of both pieces.
- Yarn over, pull through both stitches and the loop on your hook.
- Repeat across the seam to join the pieces together.
3. Turning at the End of Rows
- Slip stitches are used to help “turn” your work when working in rows, especially when you need to create a smooth, invisible edge.
- How to Use SP in Turning:
- When you reach the end of a row, chain one to create a new stitch.
- Slip the stitch into the top of the last stitch to turn your work neatly.
4. Adding Edges or Borders
- Slip stitches are commonly used to create a neat and polished edge around blankets, scarves, or other projects.
- How to Add an Edge with SP:
- Work along the edge of your project.
- Insert the hook into the space between two stitches.
- Yarn over, pull through the space and the loop on your hook to create a smooth border.
5. Joining New Yarn
- When your yarn runs out or when switching to a new color, a slip stitch is a common method used to join the new yarn.
- How to Join Yarn with SP:
- Make a slip knot with the new yarn.
- Insert the hook into the stitch where the new yarn will join.
- Yarn over with the new yarn and pull through both the stitch and the loop on your hook.
Read Also: Alpaca Silver: The Ultimate Guide to This Precious Metal
Tips for Working with Slip Stitches
Slip stitches are easy to learn, but they can sometimes be tricky to work with because they tend to be tight and small. Here are some tips to help you work more effectively with slip stitches in your projects:
1. Keep the Tension Consistent
- Slip stitches should be snug, but not so tight that they are difficult to work into later.
- Keep your hand relaxed to avoid pulling the yarn too tightly.
2. Count Your Stitches Carefully
- Because slip stitches are small and flat, they can be easy to overlook when counting your stitches.
- Use stitch markers to help keep track of where your slip stitches are if needed.
3. Practice Makes Perfect
- The more you practice slip stitching, the more comfortable you’ll become with the technique.
- If you find that your stitches are too tight, practice working more loosely to avoid frustration in future projects.
Advanced Uses of Slip Stitch
Once you’ve mastered the basics of slip stitches, you can explore more advanced techniques. Slip stitches are often used in decorative and structural ways in advanced crochet techniques.
1. Slip Stitch Ribbing
- Slip stitch ribbing is created by working slip stitches in the back loops only, giving a stretchable and textured effect, often used for cuffs, necklines, and other areas that need elasticity.
- How to Make Ribbing with Slip Stitch:
- Work in rows of slip stitches into the back loops only.
- The fabric created will have a ribbed texture that stretches and contracts easily.
2. Surface Crochet
- Surface crochet is a decorative technique where slip stitches are used to create raised patterns or lines on the surface of your project.
- How to Surface Crochet with SP:
- Insert your hook through the fabric at the desired point.
- Yarn over and pull up a loop, then slip stitch across the surface to create raised designs.
Read Also: Slag Glass: Uncover Hidden Beauty & Value
Conclusion
Slip stitches (SP) may seem like a simple part of crochet, but they are an essential technique that can be used in a variety of ways. From joining pieces together to finishing off rows or creating decorative edges, slip stitches are a crucial tool in any crocheter’s toolkit.
By following the step-by-step guide on how to make slip stitches, understanding their various uses, and practicing consistently, you’ll be able to master this stitch and improve your overall crochet skills. Whether you’re a beginner or a seasoned crocheter, learning to use slip stitches effectively will help you create cleaner, more professional-looking projects.